Shady Characters: Planting for Shade

Shady Characters: Planting for Shade

Shady Characters: Planting for Shade

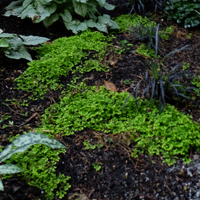
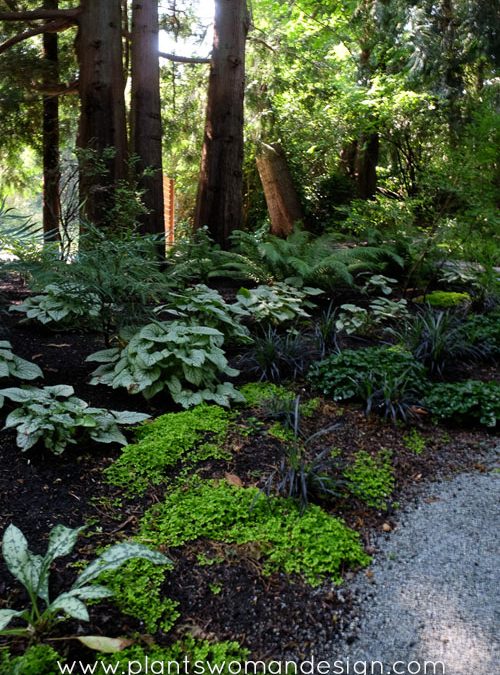
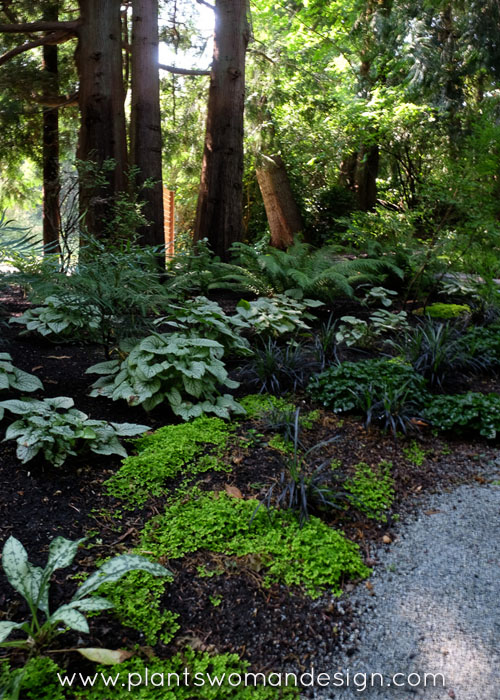
Tall fir and cedar trees tower over this garden bed which can create a tough place for plants to live. The roots of the trees and their greed for water will make many plants give up and die. However, these plants, with supplemental irrigation,  can not only hold their own but thrive.

Pulmonaria ‘Diane Clare’ Lungwort

The leaves of the PUlmonaria ‘Diane Clare’ Lungwort have both spotty variegation and solid white leaves. The blue flowers, which turn to lilac with age, bloom in May and June. The long graceful leaves lends a different texture to the combination.    Zone 3, can take dry shade or moist soil.

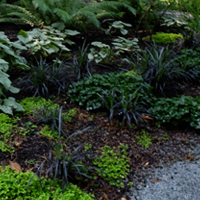
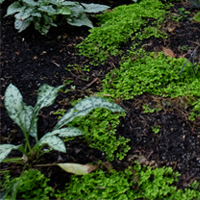
Ophiopogon planiscapus nigerscens – Black Mondo grass

Once a rarity Black Mondo Grass is now becoming more readily available. Many times it is used in a sunny situation where the black leaves become scorched and sad looking. Here in the shade mixed with low growing Golden Spike Moss it is amazing. Not fussy about water and great next to a path it is able to spread to its hearts content. Zone 6, prefers moist soil, blooms in July-August, evergreen (or ever black).

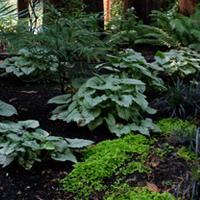
Brunnera ‘Jack Frost’

Variegated spiderweb patterned leaves and floating blue flowers light up this area despite gray weather. Filtered sunlight and access to an adequate amount of water is all they need. Irrigation in this area helps to maintain their lushness and the shallow roots don’t have to compete with the deeper roots of the trees. ZONE: 5, likes moisture, blooms in April and May.

Selaginella krassiana ‘Aurea’ – Golden Spike Moss

This sweet little creepy thing really creates a matte of contrast  to the black mondo grass. It disappears a little bit in the winter but comes back lushly in the spring. Zone 7, prefers moisture, part shade to shade, evergreen to semi evergreen.
Protecting Your Vegetable Garden: Galvanized Fencing

Protecting Your Vegetable Garden: Galvanized Fencing

When Autumn comes along, it is hard for me to give up my vegetables. I especially miss the ability to go out and grab just a few leaves of something to make a salad or to add to an omelet.    Every year I reserve a small section of my veg garden for my fall crop of salad leaves.  Planted at the middle of September the small plants are coming along just fine.  During the summer, my local rabbits munched on some of my salad greens, a few peas, and tops of carrots.   Not liking to spread stinking spray or trap, I just let them have a few bites.  However, every leaf counts in the fall and I’m not willing to share with those fuzzy little beasties. Their munching makes a big dent in my fall harvest and they will have to be kept out.
plantswoman design vegetable garden protection
I have used pot trays to keep the leaves from being eaten until now but as the leaves get bigger they will need more room to grow.
plantswoman design vegetable garden protection, galvanized fencing panels,
One on the most useful things I’ve found for my veg garden are pieces of galvanized fencing.   Purchasing one big panel can provide several pieces that have multi-use functions.  The fencing can be cut with bolt cutters so a saw isn’t needed.  Cutting off the bottom cross sections (either one or two) make them self staking. For my small plot of winter salad greens, they can be used to keep out the munchers.   But because the rabbits are pretty small netting needs to be attached to the fencing to keep them from getting through the holes.   Using netting from the fruit trees is a great way to re-purpose and reuse.
The netting can be placed around 3 sides of the panel with the bottom tucked under the self-made stakes that are created from cutting the larger panel into smaller ones.   As the smaller panels are forced into the ground the mesh is caught and held tight.   Use garden twine to secure the top portion of the netting.  Since the rabbits don’t really jump, 2 – 3 feet is all that is needed to keep them out.  Cover the fourth panel in netting independently so it can be removed when you need to work inside the bed. For added weather protection grow cover can be spread over the top to increase heat and keep frost off, either attached or just laid on top depending on wind conditions.   It has been sunny and warm in the daytime and about 45 or so at night in my area. You can find seeds that are suitable to the conditions in your area at your local nursery.   Spinach, arugula, and leaf lettuce are good to start with.    Usually you want to start fall crops about 4 – 6 weeks before the first frost date in your area.

Six Ways To Use Galvanized Fencing In Your Garden:

  • Support for vines like squash to keep them off the ground.
  • Permanent fencing
  • Support for peas and beans.  They will climb up them easily.  They can also support bush beans from falling over.
  • Permanent espalier support
  • Temporary fencing to keep out animals (including chickens).
  • Walls for compost bins to help with air circulation.
Let me know if you have ever used galvanized fencing and what you did with it!  Comment below.
Fall Garden List

Fall Garden List

Welcome to those clicking over from our newsletter!  Here are more details on my top 10 ‘to-do’s’ for the Autumn.  If you didn’t get this from our newsletter sign up!  It’s free and we typically send newsletters about once a month. With out further ado here is my list of things to do this month in the garden.
  1. Harvest tomatoes and other vegetables that are warm season plants. As the nights cool the ripening process will slow down and rain will bring on some rot potential in the warm season plants. Broccoli, kale, cauliflower, brussel sprouts all are happy to have the cooler weather and will thrive.
  2. Plant cool season crops, along with leafy salad crops like arugula, spinach, and lettuce. These will germinate in the 60-degree days and you can harvest for a couple of months in my zone 7-8 garden. You can also put in starts of broccoli, kale, cauliflower, and Brussel sprouts (check your local nursery). Also available now are garlic bulbs for next year’s harvest.
  3. Remove any dead plants from the summer and think about replanting now for good root growth in the fall and establishment for next year. Some of the plants that did not make it in my garden were planted in the late spring and early summer. A long dry summer was the culprit in their demise. The plants I planted last fall did well.
  4. Weed any persistent weeds and cover area with mulch. This will keep weeds in check for next year and feed the plants during the winter.
  5. Prune fruit trees as the growth slows. Learn about pruning different kinds of trees so the pruning you do is effective not harmful. See my blog post on pruning espalier trees.
  6. Start dividing plants that have overgrown their spots. Iris, persicaria, sedums, and campanula are some that need to be divided in my garden. I will pot them up and give away or sell. This is a great by product of a successful garden.
  7. Clean out the greenhouse and prepare for winter. If you have a greenhouse this is a good time to get it ready. See my blog post on greenhouse prep. If you don’t have a greenhouse there are several ways to overwinter plants that aren’t hardy. Look for an upcoming post on DIY cold frames and mulch holding beds.
  8. Write it down. Keep good records of what did well in the vegetable garden and what did not. I have a beautiful tomato called indigo rose in the garden. It is pretty but it will not ripen. I have about 200 tomatoes on the plant and have had about 10 ripe ones. They have been a lovely black color since June. Yes, I’ve pruned it many times. Yes, I’ve eaten them and they are really not ripe. I won’t grow it again.
Two good books to help with this are ‘Week by Week Vegetable Gardener’s Handbook by Ron Kujawski and Jennifer Kujawski, and Vegetable Gardener’s Journal from Cool Springs Press. I also record my progress in the main garden in a garden journal. I have several filled journals on the shelf that have a record of gardens from when I first began gardening to the one that is ½ filled now. Sometimes, now, I spend more time on my blog posts than in the journal but the posts do tie to my gardening through the year. Plants I love, weather, plants I killed, where I got them, bulbs and seeds I planted, it all goes in the journal.
  1. Save seeds. I have saved seeds from various plants for years. It is easy to do and provide next years starts for no money and blank seed packets are available online. There is also lots of information about how to save seeds. A good resource is a free handbook on line at http://howtosaveseeds.com/toc-handbook.php. I also like ‘Seedswap’ by Josie Jeffery. It has a section on how to save seeds but also how to connect with seed banks, starting seeds, and growing on. It is just great reading about seeds in general.
10. Turn compost pile if you have one, and remove any weedy debris piles. I like to save a woody debris pile for insects to overwinter. In the Pacific Northwest, your compost pile should be kept in a fairly dry area. If there is a lot of moisture and leafy vegetation it will be a breeding ground for snails and slugs instead of habitat for small animals and insects.
Greenhouse Prep

Greenhouse Prep

BRR it’s getting cold out there… How can it be 37 degrees last night? I’m beginning to realize my neighbor was right when she said we lived in a frost pocket. It was 37 when I got in my car and by the time I turned off my road onto the main road it was 45. That is a pretty big difference in temperatures. My plants are ready to move inside and the greenhouse is almost ready.

Many times greenhouse keepers clean out their greenhouses in the spring after all the plants are moved out into pots or the ground. My greenhouse becomes home to my collection of hardy orchids during the summer so I don’t do a big spring clean out. I usually wait until after summer before the temperatures really drop to make tackle the task. It’s nice to have a little warning before the temps drop but three years ago we did not. It was warm and sunny with lows in the 50’s until November then one day in it was 30. Many plants were still in full leaf and blooming! That quick-freeze killed many established plants.

This year I’m ready and will get my non-hardy plants into the greenhouse before its too late. Before I do that though, I needed to get it finished.

Many of you saw the beginning of the greenhouse last year (click HERE to read about it). The bottom is made of cinderblock and the top of recycled windows. I only had enough windows last year to make the bottom row of windows and the rest was plastic. This year it was time to finish the top rows and take off the plastic. The windows I like to use are usually $4.00 each pane, if you get a craftsman style window it can be $20 or more. I usually opt for 1 or 2 pane windows. A total bill of $35.00 is pretty easy to swallow after looking at new window options or the polycarbonate at the hardware store. I used the polycarbonate for the roof last year and this year bought one more piece to fill in where the glass didn’t fit just right. Flexibility is the key to using recycled materials. Being precise and rigid will not help in making this greenhouse. Once the gaps are filled the eclectic look is rather fun.

After placing the rest of the windows I pressure washed the interior, cleaning out debris and old pots, throwing away dead plants and dumping it all on the compost heap.

Windows were washed and panes checked for cracks and or broken molding. I repaired what was important and left the rest. It is rustic after all.

greenhouse disinfectantThe feed store has a safe disinfectant that I uses to spray the interior. It is the same type used at a Vet’s office or horse barn and is non-toxic to animals and people. Some bugs, viruses and fungus can hang out in the cracks and crevices of the greenhouse even after pressure washing. A good dose of disinfectant can solve MANY problems before they start.

After the interior was dry I filled the cracks and large spaces with foam weather-stripping. This is a type of material that you stuff in crevices and then caulk over the top and fills the space so the caulking can seal it. If the space was big I added a piece of wood, cut to fit. After the foam filler was in place the cracks can be caulked. I like to use a clear silicone exterior adhesive caulk. The windows have different paint colors so using a clear caulk looks better than white. (Next year I may paint the exterior).

Next, I checked the heater, filled up the propane tank and replaced lights. I have grow lights on a timer so the lights are on when I’m usually in the house in the evenings and it also extends the growing period.

greenhouse prep 003

BRINGING PLANTS INTO THE GREENHOUSE

Check each and every one for slugs and snails. One slug or snail can cause serious damage and lay eggs to hatch out all winter long.

Sometimes an organic ‘safe’ fungicide and pesticide is a good preventative idea. Usually mealy bugs and spider mites are killed in the summer sun but not always. Citrus is especially hard to keep pests off.

Water all transplants well. I usually put my tropicals in the garden so they have a chance to really grow. Putting them back in a container can be traumatic so give them some love.

Leave air space around all the plants. Do not try to cram too many in at one time (that is my biggest problem). If it is a coleus that you love just take cuttings and root those instead of trying to bring the whole thing in. Begonias can be overwintered as bulbs as can cannas and colocasias. Let them go dormant before bringing them in and save space for shrubs that can’t (check out this Little Bytes post for how to overwinter bulbs). Even bananas can be overwintered in a garage without soil.

This type of greenhouse is fun, economical and functional. It has plenty of space for tall plants as well as shelving for small succulents. There is usually a dry area of the greenhouse and a wet area. The dry area has the humidity but not constant water. Occasional water is best for those so not watering one whole section is easier to remember. If it gets really cold you can wrap the whole house with another layer of plastic to aid in insulation. I live in Zone 7 so seldom does it get in the below freezing for any length of time. The recycled windows are usually not double paned or insulated so they will lose heat if there is no sun and it gets extremely cold.

A greenhouse is a wonderful thing.

Plant Like A Designer: Bright & Hot

Plant Like A Designer: Bright & Hot

Many of my clients have heard me say, “I don’t put it in your garden unless I’ve grown it myself.’ I am always experimenting and trying out new plants. After one Northwest Flower and Garden Show the sales rep from Encore gave me several varieties of Encore Azaleas. I tucked them into my garden and gave them a year to grow on to see how they survived a winter. Of the seven varieties I received, two did well, and five didn’t do so well. The ones that did well bloomed well, recovered from a cold winter, and looked good coming out of it. The five that didn’t do so well looked bad, they struggled through the winter and didn’t bloom. Because of this field test, I was able to add two azaleas to my pallet of plants which I still use today.

But, because of my field testing, my garden can look a little haphazard. Sometimes I will put a plant in two different areas to test drainage, hardiness, or sun/shade. Or plant three or more of the same species of plant in various colors together. Experimentation is exciting when plants that are not hardy survive, unexpected color combinations present themselves, and learning that not giving a plant everything it wants keeps it under control. Dead plants will always be a design flaw. Invasive plants are also a design flaw.

Pictured above is a newly created bed in my garden. As I contemplate the design for this bed, I’m taking a walk in my client’s shoes. The result is a design that would satisfy many of my customers. Striving for a minimal color pallet in leaf color, bloom and texture it looks and will look amazing. All the foliage in the bed is bright green and blue-gray. The flowers will be either white or lavender and blue. I dropped in three contrast plants to make the bed continue to pop in the late summer. A gray leafed Lobelia tupa with a brick red flower, and colocasia sangria, a gray leafed elephant ear with a red stem, and a low groundcover geranium ‘Hocus Pocus’ with a dark red leaf and blue flower.

Here’s how I planned this bed along with 5 useful tips for designing your garden bed. 

1. Choose for height. There are higher plants in the center with graduating heights toward the edges. The far end of the bed has a taller section with an evergreen Eriobothrya japonica (Loquat) for screening from the neighbor. 

2. Choose evergreen, deciduous, and perennial plants. I want to be sure that the bed looks good year-round. This bed is right in front of the window that looks towards the koi pond. So I made sure to strike a balance between all the elements so there are no big blank spots that would show up in the winter or summer because of dormancy.

3. Choosing color and texture. I pay close attention to the play of texture and color in leaves. The balance of texture between the Carex ‘Evergold’ and Stachys Bella Grigio’s blooms is just as exciting as the contrast in leaf color. The spikes of Agapanthus ‘Blue Leap’ between Lavender ‘Richard Gray’ and Spirea ‘White Gold’ are also an exciting combination.

4. Bloom time. Surprising enough, the last thing that gets consideration from me is the flowers. Because there are so many great plants to choose from, it is easy to get the flower color right. Early blooms from the geranium and the campanula ‘Dickensens Gold’ will be the first to show here. The Agapanthus, Lavender, and Centaurea simplicicaulis will be next. Later season blooms will be Caryopteris ‘Dark Knight’, Salvia elegans ‘Gold’ and the Lobelia Tupa. 

5. Site considerations (AKA where is the sun). Usually, this is pretty easy to define. Sometimes you can add something that likes shelter behind something more prominent. The Lobelia tupa wants to have shelter, so I planted the Pittisprorum ‘Blue Wave’ between the water and the lobelia. This arrangement should protect the lobelia from the brunt of the weather.  

Variations in the number of plants are flexible and entirely up to the designer. Repetition of plants creates rhythm and looks natural because, in nature, plants do seed around and create groups. 


Plant List for Hot and Bright! 

Lobelia Tupa, Caryopteris ‘Dark Knight’, Agapanthus ‘Blue Leap’, Spirea ‘White Gold’, Geranium ‘Hocus Pocus’, Campanula ‘Dickenson Gold’, Carex ‘Evergold’, Colcasia ‘Sangria’, Lavender Richard Gray, Centaurea simplicicaulis, Salvia elegans ‘Gold’, Pervoskia atripicifolia, Stachys ‘Bella Grigio’, Saxifraga crustata, Salvia nemerosa ‘Blue Marvel’, Panicum ‘Ruby Ribbions’. 


Easy-Peasy Garden Beds

Easy-Peasy Garden Beds

One of the most amazing things about gardening is the way that gardeners share information. We are (and should be) willing to share methods and tips about gardening, things that worked for us and things that didn’t. What I want to share with you today is a gardening method that was shared with me by a great gardener over 15 years ago.

I was just out of college and was beginning to realize all that I didn’t know about gardening. Many people think they know so much when they get out of college, ready to tackle anything. I quickly found out that people who had been gardening since before I was born actually did know more than me. Ah, the arrogance of youth defeated!

Karen had been slowly reclaiming her forested plot into garden one bed at a time. She would plan out where she wanted the bed, clear it of sticks, large clumps of foliage (just cut back), and move anything worth saving. We have a small appliance company on the island and she would ‘recycle’ their cardboard by taking what she needed from the dumpster (original recycling at work). Several layers of cardboard with staples and tape removed would be laid on the ground where the planting bed would be. Mulch was next, at least 3 inches of mulch was laid over the top. She would use whatever she had and purchase what she did not. Wood chips from a fallen tree, leaf litter and manure were the usual materials. Sometimes there would be enough compost from her compost pile to use as well. If there were only woody materials she would add good compost mulch to the top. The materials would then be thoroughly soaked with water, making sure that the cardboard beneath was wet through. Then she just walked away.     Amazing! In just 4 – 6 months the bed would be ready for planting. The weeds, plants, and grass in the bed were dead, the cardboard was gone and the bed was full of worms and great airy soil.

Admittedly I was a skeptic, until I tried it myself. Now if I can wait and don’t need to plant immediately I do this same method. In fact I used it last year to put in a late veg garden after I moved into my new house, 4th of July Garden. Because I was planting the bed right away I piled all the soil needed for the veg beds on top of the cardboard, about 6 inches, and planted away. Vegetables only need about that much soil to be successful. The raised edges of the beds held the soil in.

Now as I’m planning and planting the edges of my property I’m working on some areas to get them ready but don’t need to plant anytime soon. In the edge behind the west planting bed I wanted to get rid of a grass strip between my neighbor and I.

Here is a step-by-step guide for creating a planting bed the easy-peasy way.

Easy-Peasy-Garden-Bed-003

  1. Collect cardboard or newspaper. A layer of cardboard is a good choice but paper grocery sacks, newspaper and other recyclables can be used. No glossy magazines or plastic coated cardboard.    Easy-Peasy-Garden-Bed-001
  2. Clear away any debris. Leave weeds, grass, bark mulch, etc.   Warning- this method may not kill horsetail. It will lie dormant under it until you dig in the soil and will start again. It has killed every other weed I’ve covered.Easy-Peasy-Garden-Bed-004
  3. Layer paper material. It should be at least 1 inch thick. Cardboard can have just two layers.
  4. Add composted material to the top of the cardboard at least 6 inches thick. I did not have any other materials so I used Fish Compost from our local supplier. If you do this in the fall there are lots of materials to use. The added benefit is that it is ready in the spring to plant. I can always add to the top as things become available.  Easy-Peasy-Garden-Bed-005
  5. Water the whole thing in good. In the summer you will probably have to water it occasionally to keep it moist. The worms will come and live in the cardboard and paper material and do the work for you. The lack of light and heat from compost will kill the weeds and the action of worms as they create habitat will give you good worm casings and organic material as it all breaks down.
  6. Walk away. Check the moisture level occasionally and watch for blown in weed seeds.

Have you have tried this method before? I love it because it actually looks finished and it’s not. I have so much work to do here that some finished looking beds are a good thing.

Sharing the love of gardening and tried and true methods of gardening is really an added benefit of gardening. The social aspect of sharing plants, secrets and swapping stories never grows old and broadens our viewpoint.

Little Bytes: Pleaching

Little Bytes: Pleaching

Pleaching-featureIn thePWD Pleaching Tools blog ‘progress yes progress’ I wrote about pleaching my espalier cherry trees into each other.  I thought it would be good to talk about pleaching and also create something fun for Little Bytes at the same time.

Pleaching is a type of pruning that causes two branches grow together.  It is used in creating espalier fences, living fences and living art pieces.   For Little Bytes I thought it would be fun to create a living hide out for kids.  My grandkids will be here this summer (I hope) and they will be so excited to have the play structure to play in.

Pleaching-willow-001Here you can see I’m cutting off some branches off a willow tree next to the upper pond.   I’m choosing willow because it is really easy to work with, it roots easily, it will be easy to pleach and since it grows on my property it’s free!

Pleaching-willow-002Choose long pieces and trim off lower branches.  I left some of the upper branches because we will intertwine them and tie them together.  You can see our helpers in the background.

Pleaching-willow-010To make your hide-out lay out a circle and check the inner size, I had my assistant stand in the middle of it to make sure it would be big enough for two kids. (Thanks Jen)

Pleaching-willow-003Using the shovel dig holes about 6 – 10 inches deep along the path you have laid out.  Place the long willow pieces in the holes and stomp down the soil around them.  This is a very wet area so the muddy soil held well. I planned the entrance to face the side yard with the pond behind the tepee.   I was worried that some tumbling around might land the kids in the water so…. let’s be on the safe side!Pleaching-willow-005Pleaching-willow-004Using the upper branches that are still left and start weaving them together. Using the tape to secure them together.

Pleaching-willow-008Pleaching-willow-006Choosing the strongest branches make a little cut on both sides of the branches and then put the cut edges together. Use the tape to secure the branches together so they are tight.

Pleaching-willow-009Using the tape and weaving method connect the rest of the branches together.  Now there is some danger of the grafts not taking because the willow have been cut and may not root out.  I took some of the cuttings I didn’t use and put them into water to root them conventionally and will use them to re-graft later if necessary.

Pleaching-willow-arch-001Here is a close up of the archway entrance.  You can see the tape holding all the pleached branches together.

Pleaching-willow-staking-001Place a stake towards the windward side of your tepee if needed.  The structure will be weak until it is rooted in.  I’ll keep you posted on how it roots in.  The wax tape will fall off after about a year.